Cabinet Painting is a major undertaking, but with the proper preparation and premium paints, your finished product will stand up to years of use and frequent cleaning.
A high-quality, cabinet-grade acrylic will stand up to moisture and food spills and clean easily, without odors. Contact Cabinet Painting Sacramento for professional help.
Be sure to label all hardware before removing and placing it in a bag for easy reattachment.
If you’ve ever done a big painting project in your Oviedo home, you know how important prep work is. Without it, your new paint will not stick to the surface, and it will probably chip or peel quickly. This is especially true if you are repainting over an existing finish or paint job. You need to sand the surface to roughen it up and give your new coating something to adhere to. That’s where Cabinets primer comes in.
A quality Cabinets primer provides a base for your next coat of paint and can hide blemishes, as well. It can also help even out the color on a worn wall or surface. Cabinets primer is available in both water-based and oil-based formulas. Water-based primers are popular for their quick clean-up and low VOC (volatile organic compound) levels, making them ideal for indoor use. However, they may not be as durable as oil-based primers.
Oil-based Cabinets primer is ideal for wood or bare surfaces, as it seals the pores of the material and provides a smooth surface for painting. It is especially helpful if you are painting over an old, oil-based stain or polyurethane finish. Most oil-based Cabinets primers are tintable, allowing you to create a base that is closer in tone to your finished paint color.
No one wants to spend time and money on a paint job only to have grainy wood, old stains, or other flaws show through the final coat. That’s where Cabinets primer really starts to earn its paycheck. It’s like joint compound for your paint job, filling in the little imperfections so they won’t stand out later on.
Adhesion primers are great for slick surfaces like laminate or glossy paint, as they create a bond that will keep your new coat from chipping or peeling. They don’t hide stains as well as other types of primers, though. So if you’re dealing with nicotine stains or water damage, you might want to invest in a stain-blocking primer. Stain-blocking primers are also good for hiding odors from smoke or other sources.
Paint
When painting cabinets, the paint choice makes a big difference. The right cabinet paint will look beautiful and last for a long time. Cabinet paint is often formulated with extra resins to make it more resistant to scratching, staining and fading. It can also contain special pigments to camouflage imperfections and provide a smooth surface. Cabinet paint may cost more upfront than wall paint, but it is well worth the investment for a high-quality finish that will stand up to years of wear and tear.
There are several different cabinet paints available, including latex and oil-based. Latex paint goes on easily and dries quickly, but it is not as durable as other types of paint. It also emits less odor than oil-based paint and is water-cleanup friendly. Oil-based paint, on the other hand, offers superior adhesion and durability to sanded softwood cabinetry. It requires two coats for an even finish, but it provides a hard and scrubbable surface that will hold up to heavy use.
Before painting, all surfaces must be cleaned thoroughly. Any grease or cooking oils must be removed, as paint will not bond with greasy surfaces. Surfaces should also be lightly sanded to ensure proper adhesion. Once the surfaces are ready to be painted, all hardware must be removed and placed in plastic bags so that it can be reinstalled later. Countertops and appliances should be covered and masked to prevent spills.
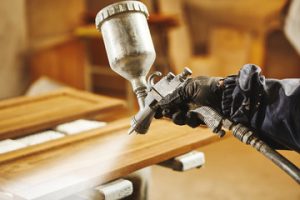
Spraying cabinets with a professional paint sprayer can yield an incredible result with minimal brush marks and stippling (tiny dimples from rolling). This type of finish is very similar to the factory-like finish you’d get when ordering brand new cabinetry.
When choosing a painter for your project, ask for recommendations from friends and family. It is also important to read online reviews and look at before/after photos. Be sure to consider the amount of time the job will take, as well as any additional work that may need to be done, such as touchups or refinishing. A reputable cabinet painter will provide a clear estimate for the entire job.
Finish
Cabinet painting requires a certain amount of skill and experience. Not only do you need to properly prep the surface, but it’s important not to forget about the finishing touches. This can make a big difference in the overall look of your cabinets and how long they last.
The type of paint used can also make a huge impact on the final result. If you choose an inferior brand, you could end up with a finish that looks dull or has chips within just a few years. This is why it’s important to use a premium paint that will stand up to the harsh kitchen environment. At Walla Painting, we exclusively use Milesi products for our cabinet painting services because they offer an extensive color palette and are formulated to resist chipping, scratching, and moisture damage.
During the sanding process, it is often necessary to remove the doors from the cabinet frames and to empty them. This makes it easier to get the best results and prevents the contents from getting covered in dust or paint. It’s also a good idea to number each door so that it’s easy to remember which one goes back where after the job is done.
Once the surfaces have been sanded and washed, they should be primed before applying the new paint. A quality primer will help ensure that the top coats adhere to the surface and that any blemishes are covered up. We highly recommend using a primer that is specifically formulated for cabinetry as it will provide the best results.
The next step is to apply the first coat of paint. This is the most time-consuming part of the job, but it’s essential for ensuring that the top coats adhere well to the bare surface. We recommend using a soft brush and light pressure, and avoiding overworking the area so that you don’t create any noticeable brush marks.
Once the cabinets are painted, it’s a great time to think about upgrading your hardware. This can make a big difference in how your cabinets look and can really complete the look of the room.
Hardware
Cabinets get a lot of use and the knobs and handles often don’t escape this daily contact with fingers, food, and grease. If your kitchen knobs have become worn and damaged or are simply outdated you can give them a new look with spray paint. To ensure a good, long-lasting finish on your hardware you need to take the time to clean and prep it before you begin painting. This helps the paint stick better and will make it last longer. First, use a mild cleaner or dish soap to wash the surface. Next, sand the knob to roughen it up. Then rinse the knob with water and dry it thoroughly.
Once your cabinet doors have been painted and are completely dry, you can re-attach the knobs. Before you do this though, it’s a great idea to label them. This will save you a lot of frustration and confusion when it comes to re-assembling them. Count the hinge holes on each door or drawer front and write the number in pencil (or on a sticky note). As you remove each piece, place it in a bag with the corresponding number and store the hardware for that cabinet in the same bag. This little step can help you avoid the biggest mistake made by amateurs – mixing up the hardware.
After all of the work you’ve put into your cabinet painting project, the last thing you want is to have to re-do it. If you fail to properly prepare your cabinetry for paint, you’ll run into adhesion problems that will make your entire project a nightmare.
If you follow these simple steps, you can be sure to have a successful and professional cabinet painting project. Whether you’re looking for a complete room remodel or just an upgrade to your kitchen, cabinet painting can be one of the best home improvements you can make. It can be an expensive project, but it can also give you a huge return on your investment and make the rest of your home look even more beautiful. Good luck!