Cabinet refacing provides the visual impact of a full remodel with the savings and timeline flexibility of a budget-friendly update. It’s also designed to stand up to years of holiday feasts and weekday chaos.
Refacing isn’t a DIY-friendly project. Professional installation guarantees a precise fit and high-end finish that lasts for decades. Contact Cabinet Refinishing Sacramento for more details.
Cost
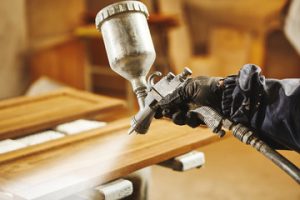
Cabinet refinishing is a labor-intensive project that can be expensive. It is best for homeowners who are prepared to invest significant time in the project and have a good understanding of what to expect. The cabinet refinishing process involves stripping the existing finish with a chemical paint or stain remover, followed by lots of sanding and, oftentimes, multiple coats of fresh paint. This can be a DIY project, but it is typically more cost-effective when handled by a professional who can minimize waste, save you from the dreaded odors of chemical paint strippers and sanding, and ensure you have an expert job with great results.
While refinishing can provide a big visual change for the price, it is only a short-term solution. It will need to be repeated every 5-7 years at the very least, and it isn’t ideal for high-traffic kitchens. Cabinet refacing, on the other hand, can give you the bold design changes you are after, while improving durability and boosting home value.
The most obvious benefit of refacing is the considerable cost savings over refinishing or replacing cabinets altogether. Refacing can save you between 30-50% compared to replacing your cabinetry, depending on the materials used. This can free up your budget for other renovations or upgrades to your home, making it the most affordable option of the three.
If you are ready for a full-scale remodel, but don’t have the funds to replace your cabinets entirely, refacing is the best option. This allows you to have your cabinet doors replaced with a new style while retaining the boxes and framework of your current cabinets. Whether you choose solid-wood, MDF, or thermofoil, there is a wide range of styles to suit your taste and home.
With a professional installation, your new cabinet doors will be a long-term addition to your kitchen and withstand the wear and tear of everyday life. They will also look great and improve your home’s curb appeal, which is always a positive for potential buyers. This is a great way to add value and create a gorgeous space for cooking and entertaining.
Time
When your cabinets look worn down, scratched, or dated, a fresh coat of paint can do wonders. However, even high-quality DIY jobs can only hide so many chips and dings before they start to show through again. Eventually, the time comes when you need a more long-term cabinet upgrade that can handle years of family feasts and weekday chaos.
Whether your cabinets are made of wood, engineered wood, or medium-density fiberboard (MDF), you can get them looking new again through cabinet refinishing and refacing. Refinishing takes the existing cabinet doors and drawer fronts and transforms them through hand-sanding and chemical stripping, followed by a new stain or paint. Refinishing works well if your cabinet boxes are in good condition and you simply want to update the color of the doors and drawer fronts.
The beauty of refinishing is that you can create nearly any look you can imagine, from modern and minimalist to rustic and traditional. You can also experiment with bold colors, transforming your kitchen from dark oak to espresso or even bright white. This gives you more design flexibility than a complete replacement, which typically means that the new cabinets have to match the existing style.
Another advantage of refinishing is that the process is far less invasive than replacing. A full replacement requires gutting part or all of your kitchen, and entails dealing with noise, dust, and workers constantly coming and going. Refinishing, on the other hand, takes just a few days to a week and can be completed with minimal disruption to your daily life.
This is especially true when you opt for a fast-curing finish. Our innovative technology allows us to cure your cabinets in hours instead of weeks, minimizing the amount of time you need to be without your kitchen. And with a shorter timeline, you can return to your normal routine faster and enjoy your refreshed space sooner. Refinishing is also a greener choice, as it reuses your existing materials and keeps them out of landfills. Replacing, on the other hand, creates more waste because it involves tearing down and replacing parts of your home.
Preparation
Cabinet refacing is an ideal solution for homeowners who are looking to update their kitchen without the high cost and long-term commitment of replacing their cabinets. The process involves removing the existing doors and drawer fronts, then applying new veneer to your cabinet boxes and face frames. The result is a fully updated kitchen that looks brand-new and has a fresh, modern feel. It’s also a smart choice for homeowners with older cabinets that have been damaged by water or smoke.
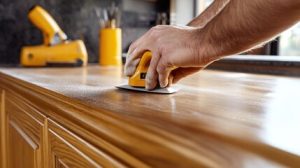
Before your cabinets are refaced, the installer will make any necessary repairs and prepare the surface to accept the new veneer. This can involve cleaning, sanding, or even the application of a primer depending on the type of veneer you choose. Once the surfaces are ready, the installer will attach the new veneer to your existing cabinet boxes and face frames using a strong bonding agent.
During this stage, the installer may also replace any broken hinges or pull handles and install new drawer tracks if needed. Your cabinet boxes will then be sanded down and stained, again based on your desired color. Then, the new cabinet doors and drawer fronts are installed. Typically, these are made from premium 3D laminate, or you can opt for real wood door slabs that are handcrafted and custom-sized to your exact specifications.
Once the installation is complete, your new cabinet boxes and faces will have a smooth, factory-finished look. Your cabinet doors and drawer fronts will have a fresh, new appearance that will stand the test of time.
Both cabinet refinishing and refacing offer great benefits, but which option is right for you? Only you can decide, but it’s important to understand the strengths and limitations of each method. If your cabinets are heavily worn or damaged, consider skipping refinishing altogether and opting for a full replacement instead. Then, you can recoup around 75% of your investment at resale and enjoy a kitchen that feels new and revitalized. For most homeowners, that’s a win-win!
Results
Cabinet refinishing is a cost-effective solution for homeowners looking to refresh their kitchen. This method removes the doors and drawer fronts from their existing cabinets and gives them a fresh coat of stain or paint, leaving the structure in place. This type of upgrade is best for historic homes that want to preserve their original style or a homeowner who wants to update the color but not much else.
It’s also a more environmentally friendly choice than complete replacement, as it avoids the waste created by the removal and installation of new materials. This is because refinishing reuses the existing cabinet boxes and minimizes landfill waste.
Refinishing isn’t a good option for structural issues, however, such as warping, water damage, or weak hinges. This type of repair can be costly and requires professional attention, making refacing a more appropriate solution in these cases.
Cabinet refacing is a more substantial investment, but it allows for a full redesign of the cabinet layout and material choices. In addition, refacing is a more durable option than refinishing, so it will hold up well to daily use. In terms of ROI, refacing is a more lucrative solution than refinishing, recouping around 70% to 85% at resale.
When it comes to refacing, homeowners have plenty of design options to choose from. From laminate and vinyl to Rigid Thermofoil, this solution offers a variety of patterns, colors, and finishes. Cabinet refacing is ideal for addressing damage, hiding chips or scratches, and giving a fresh look to the space.
It can also be a great choice for those who want a more contemporary look and are willing to sacrifice storage capacity or other functionality. Unlike refinishing, refacing is a more permanent solution that can’t be easily reversed or redone, so it should be carefully considered before committing to this project.
A full cabinet replacement is an invasive renovation that turns your kitchen into a construction zone. This is not something most homeowners are willing to endure, particularly if they’re planning on selling their home in the near future. Refinishing, on the other hand, is far less invasive and can be done in a shorter period of time.