Antiquariato Genova have a quality of craftsmanship and elegance that is unmatched by modern furniture. Their age and patina promote a sense of stability and calm that can help reduce stress levels in the home.
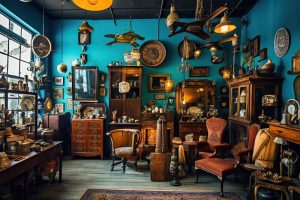
Antiques can be found at antique shops, auctions and estate sales. They are a form of decorative art and can be incorporated into any decor.
Antiques are often valued for their beauty, craftsmanship, and historical significance. They can also provide a link to the past and offer a unique style that complements modern decor. The term antique is usually reserved for items that are at least 100 years old, though some may be older. Antiques can include furniture, sculptures, paintings, ceramics, glassware, silverware, clocks, and other decorative items.
The quality of an antique can depend on the skill of its makers and the level of detail it exhibits. Generally, pieces that display exceptional craftsmanship or intricate details can be more valuable than those that are less well-made. The condition of an antique is also important, as repairs or restorations can diminish its value.
Antiques can be a beautiful addition to any home or office, and they can help to create a sense of history. There are many different styles and eras to choose from, so you can find the perfect match for your needs. You can add a touch of William Morris by using a piece of furniture covered in his signature floral patterns, or you can embrace Aestheticism and go all-out with ebonised chests of drawers engraved with gilt carvings of birds and foliage.
Another advantage of antiques is their sustainability. They are made from natural materials and will age beautifully over time, creating a look that is both classic and timeless. Many antiques are made from materials that were not widely used in the modern era, such as stone and metal, which gives them an added sense of uniqueness.
Although it is tempting to mix antiques with modern pieces, they work best when they follow a single style. Choosing a consistent aesthetic like Art Nouveau or Edwardian can ensure that the furniture looks unified and elegant, rather than mismatched and eclectic.
History
Antiques reflect the values of past societies, from the beauty of an old piece of furniture to the craftsmanship of a fine piece of jewelry. Many people collect antiques as a way to preserve cultural heritage and learn about historical eras. Whether it’s an ancient Roman vase or a Victorian settee, each antique item holds a story that can be discovered through careful research and study.
A well-established antique dealer can help you identify an object’s age, origin and historical significance. He or she can also give you an estimate of its current value. However, it’s important to note that antique values are not set in stone; they fluctuate based on market demand and condition.
During the 18th century, a renewed interest in classical art and history led to a new class of collectors. Wealthy families, including royalty, began decorating their homes with antiques as a way to show off their heritage and status. Grand tours of Europe became popular among the elite, and they brought back valuable antique treasures from their travels.
Before 1972, the antique trade was largely regional; dealers could make a fortune buying items in one region and hauling them to another where they were in high demand. The Arab Oil Embargo changed all that. The price of gasoline skyrocketed, keeping long-distance haulers out of business and forcing established antique dealers to rethink their business models. Group shops and antique shows grew in popularity, and part time and hobbyist dealers prospered. Trade papers and book publishing companies won as well, as they educated dealers nationwide on the value of a particular antique.
Some antiques are marked with the name of their maker and the date of production, while others may be numbered or stamped. Some have a coded message that can be decoded with background knowledge, like the inscription on the bottom of an antique vase that gives the artist’s workshop, year of production and more. Antiques also display signs of use, such as scratches on wood surfaces or tarnish on metal objects.
Craftsmanship
The craftsmanship of antiques can be just as important as their aesthetic or historical value. In fact, items that demonstrate superior design and construction often carry a premium in the marketplace. Antique furniture, for instance, often features intricate carvings and durable joinery that far outperform their modern counterparts. Similarly, vintage pieces from the Arts and Crafts movement (which focused on traditional craftsmanship and rejected industrial mass production) hold tremendous appeal with collectors.
Whether it’s an intricately carved table or delicately painted porcelain, the work of skilled artisans is evident in every antique piece. These artisans invested years of their lives into perfecting their trade, creating heirloom-quality treasures that stand the test of time. In contrast, modern products are often designed for disposability and are assembled using cheap materials, decreasing their longevity and reducing their value.
Antiques also offer a tangible connection to the past, providing a glimpse into lifestyles and cultures of bygone eras. This can be especially valuable for younger generations, who may not be familiar with the styles of the past. Furthermore, the enduring beauty and quality of antiques make them an attractive investment option.
Moreover, the rarity of antiques increases their value. While many items from the past have been lost or destroyed over the years, those that remain are finite in number. This scarcity drives up the price of antiques, making them more desirable than newer items that are mass-produced and designed for disposability. Additionally, if specific information about an antique’s early history can be traced (such as who made it or when), this can greatly increase its value.
Sustainability
In a world where fast consumption and disposable goods are the norm, antiques offer a refreshing alternative that aligns with sustainability and health. They conserve natural resources, lower carbon footprints, and promote a healthy lifestyle by supporting a toxin-free, emotionally rich living environment. Many antiques are made from materials that emit low or no VOCs (Volatile Organic Compounds) and are cleaned using old fashioned methods that don’t involve harsh chemicals. This contributes to a healthier indoor air quality that reduces stress and increases mental clarity.
As a bonus, antiques are more durable than contemporary furniture and can be passed down to future generations. This decreases the need to produce new pieces, thereby decreasing deforestation, mining for metals, and other harmful exploitation of natural resources. It also means fewer items end up in landfills.
When shopping for antiques, try to support your local antique dealers or reclamation yards. This reduces the carbon emissions associated with long-distance shipping and helps to keep your dollars in your local economy. Plus, buying from local antique dealers supports community spirit and is a great way to build relationships with them over time – and returning customers are key for small businesses!
Many people who purchase antiques are inspired by the fact that they are heirloom-quality, so they can be enjoyed for years to come. It is a pleasure to watch an item with a worn surface or patina develop a new life with gentle cleaning and care, revealing a little bit of its history each time you touch it. In addition, purchasing and caring for antiques can help to preserve traditional craftsmanship and artisanal techniques that are becoming lost in modern mass production.
Personality
Antiques reveal a great deal about the people who love them. For example, if you are drawn to vintage cameras or records that capture moments of history, you are likely an appreciator of the importance of memory and history. If you are attracted to antique furniture, you likely appreciate the comfort and warmth that these pieces bring into a home.
In fact, several studies have revealed that the types of antiques a person collects can be used to identify their personality. For instance, pure collectors of antique dolls are more likely to display personality traits such as conscientiousness and neuroticism than non-collectors (Codignola and Mariani, 2022).
Another example is those who appreciate vintage wines or traditional cooking techniques. This type of person is probably more interested in the sophistication of a slow, deliberate lifestyle and enjoys the rich stories that are hidden behind each bottle of wine or each recipe.
People who choose to collect antiques often spend a significant amount of time searching for items that are in good condition and that have a high value. This can lead to frustrations when dealing with dishonest sellers, ambitious competitors or questions about whether or not an item is truly authentic. It can also lead to anxiety over the loss or damage of precious objects. However, a good collector is able to overcome these issues and continue to find satisfaction in their hobby. The way in which they handle these frustrations can also provide clues about their personality.