Ranger Plumbing Company plays a crucial role in maintaining the functionality of residential and commercial properties. Plumbing systems are complex networks of pipes, fixtures, and appliances.
Efficient plumbing ensures the smooth flow of water and waste removal. A well-maintained system prevents costly repairs and health risks.
Professional plumbing companies offer a wide range of services, including installation, maintenance, and repairs. Skilled technicians handle tasks like fixing leaks, clearing clogs, and installing new fixtures. Emergency services address urgent issues like burst pipes and sewer backups. Expertise and specialized tools ensure efficient and lasting solutions.
Pipe installation is a fundamental service provided by plumbing companies. Proper installation ensures water flows efficiently and prevents leaks. Material selection and pipe routing require careful planning. Incorrect installation can lead to pressure problems and long-term damage.
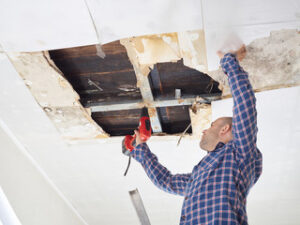
Leak detection and repair are critical to preserving a plumbing system’s integrity. Small leaks often go unnoticed but can cause significant damage over time. Professional plumbers use advanced equipment to locate hidden leaks. Early repair prevents water damage and mold growth.
Drain cleaning is essential to prevent blockages and maintain proper water flow. Over time, debris, grease, and hair accumulate in drains. High-pressure water jets and specialized tools clear stubborn clogs. Regular cleaning reduces the risk of backups and foul odors.
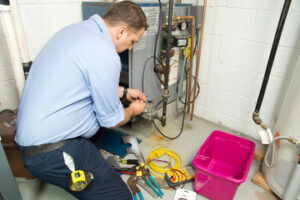
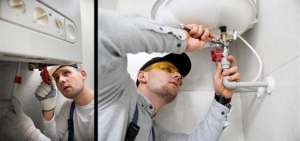
Water heater installation and repair are also key services. Properly functioning water heaters provide consistent hot water for daily use. Sediment buildup and component wear reduce efficiency. Professional maintenance extends the lifespan of water heaters and improves performance.
Sewer line repair addresses serious issues that affect the entire plumbing system. Tree roots, ground movement, and corrosion can damage sewer lines. Trenchless repair methods minimize disruption and restore flow. Timely repairs prevent sewage backups and environmental hazards.
Bathroom and kitchen plumbing upgrades enhance functionality and efficiency. Modern fixtures reduce water consumption and improve user comfort. Leak-free faucets and efficient toilets conserve water and lower utility bills. Upgraded plumbing increases property value and comfort.
Plumbing companies also handle gas line installation and repair. Gas leaks pose significant safety risks. Proper installation and maintenance ensure safe gas flow. Professional plumbers use leak detection tools to prevent dangerous situations.
Water quality testing and filtration improve health and safety. Contaminants like heavy metals and bacteria affect water taste and safety. Filtration systems remove impurities and enhance water quality. Regular testing ensures consistent water safety.
Backflow prevention protects drinking water from contamination. Backflow occurs when pressure changes cause water to reverse direction. Installing backflow prevention devices safeguards the water supply. Professional plumbers test and maintain these devices regularly.
Fixture repair and replacement improve plumbing performance. Worn-out faucets, showerheads, and valves cause leaks and inefficiency. Modern fixtures enhance water flow and pressure. Replacing outdated fixtures improves aesthetics and functionality.
Plumbing inspections identify hidden problems before they escalate. Professional assessments reveal pipe corrosion, slow drains, and pressure issues. Early detection prevents costly repairs and property damage. Regular inspections maintain plumbing system efficiency.
Emergency plumbing services provide rapid response to urgent issues. Burst pipes, gas leaks, and sewer backups require immediate attention. Emergency plumbers use advanced tools and techniques to resolve problems quickly. Fast action minimizes property damage and disruption.
Water pressure regulation ensures consistent flow throughout the property. High pressure damages pipes and fixtures. Low pressure reduces efficiency and comfort. Adjusting pressure valves and clearing blockages restores balanced flow.
Plumbing companies also offer eco-friendly solutions. Low-flow fixtures and dual-flush toilets reduce water consumption. Greywater systems recycle wastewater for non-potable uses. Eco-friendly plumbing reduces environmental impact and utility costs.
Plumbing maintenance contracts provide ongoing care and peace of mind. Regular servicing extends the lifespan of plumbing components. Early detection and repair prevent costly emergencies. Maintenance contracts ensure consistent system performance.
Pipe relining restores damaged pipes without excavation. Epoxy coatings create a smooth inner surface, sealing cracks and leaks. This method preserves landscaping and structures. Pipe relining strengthens the plumbing system and prevents future damage.
Water softening systems improve appliance performance and water quality. Hard water causes scale buildup in pipes and fixtures. Softening systems remove minerals, extending the lifespan of plumbing components. Improved water quality enhances user comfort.
Septic system maintenance ensures proper waste disposal. Regular pumping and inspection prevent overflow and backups. Bacteria treatments maintain balance within the system. Proper care extends the lifespan of septic tanks and prevents contamination.
Plumbing companies also offer remodeling and renovation support. Updating plumbing during construction ensures modern compliance and efficiency. Proper planning prevents future issues and reduces long-term costs. Professional plumbers coordinate with contractors to align plumbing with design goals.
Frozen pipe prevention and repair protect against winter damage. Insulating pipes and using heat tape prevent freezing. Thawing frozen pipes requires controlled heating to avoid bursts. Professional repair prevents water damage and restores flow.
Leak-proof pipe joints enhance system durability. Expansion and contraction cause stress on joints. High-quality fittings and proper installation reduce joint failure. Leak-free joints improve overall plumbing system efficiency.
Smart plumbing technology enhances convenience and efficiency. Smart leak detectors alert homeowners to hidden leaks. Wi-Fi-enabled fixtures allow remote control of water flow. Technology reduces waste and improves user control.
Plumbing companies also handle commercial and industrial systems. Larger facilities require complex plumbing networks. High-volume usage increases wear and the potential for failure. Professional plumbers design and maintain systems to meet commercial demands.
Water conservation techniques reduce environmental impact and utility costs. Greywater recycling systems reuse water for landscaping and flushing. Rainwater collection reduces demand on municipal supplies. Efficient plumbing design minimizes waste and improves sustainability.
Pipe insulation improves energy efficiency and prevents freezing. Insulated pipes retain heat, reducing water heating costs. Cold-water pipes are protected from condensation and heat loss. Proper insulation enhances comfort and performance.
Plumbing companies offer customized solutions for unique properties. Historical buildings require specialized techniques and materials. Custom pipe routing maximizes efficiency in tight spaces. Tailored solutions ensure optimal performance and structural integrity.
Customer education improves plumbing care and system longevity. Professional plumbers provide guidance on fixture maintenance and water use. Understanding basic plumbing functions reduces misuse and damage. Educated customers make informed decisions about plumbing upgrades and repairs.
Plumbing permits and inspections ensure code compliance. Permits are required for major repairs and installations. Professional plumbers handle permit applications and inspections. Compliance with regulations ensures safety and structural integrity.
Plumbing companies invest in advanced equipment and training. High-pressure jets, video inspection tools, and leak detection sensors improve accuracy and efficiency. Ongoing training keeps plumbers updated on industry standards and techniques. Professional expertise ensures reliable and lasting solutions.
Re-piping upgrades old plumbing systems to modern standards. Aging pipes corrode and leak over time. Re-piping improves water flow and pressure. Professional installation ensures a durable and efficient plumbing network.
Plumbing companies provide tailored service plans for residential and commercial clients. Individual property needs vary based on usage and age. Customized plans address specific challenges and maintenance requirements. Targeted solutions improve system reliability and lifespan.
Professional plumbing services protect property value and structural integrity. Efficient systems reduce water waste and energy costs. Well-maintained plumbing prevents property damage and health risks. A reliable plumbing company ensures long-term system performance and homeowner peace of mind.