A leaking pipe or damp carpet might seem like a minor issue, but leaving it untreated will cause serious problems for your home and health. Learn how long-term water damage can undermine structural integrity, create electrical hazards, lead to mold growth and pest infestations, and increase your repair costs.
Untreated Water Damage Salt Lake City can also compromise your personal belongings, such as furniture and rugs. They may develop mold, swell or warp, and become unsalvageable.
Damage to Building Materials
Leaving water damage untreated is a major mistake that can undermine building materials, compromising structural integrity. It can also create dangerous electrical hazards, encourage harmful mold growth, and cause health issues for occupants.
Untreated water damage can lead to a host of problems that are expensive to repair. Even minor water intrusion can erode wood, weakening important components of the building structure like beams and columns. Over time, these weakened structures can contribute to sagging floors, walls, and ceilings, as well as misaligned doors and windows.
Water damage can also threaten personal items in the home, including furniture, clothing, photographs, and documents. Depending on how long these items remain in a damp environment, they may become permanently damaged or destroyed. Steamatic technicians are trained to quickly and thoroughly assess and salvage items that have suffered from water damage.
Over time, if left untreated, moisture in porous building materials creates an ideal environment for mold and mildew to thrive. When inhaled, these airborne spores can trigger allergies and respiratory problems. For people with pre-existing conditions, such as autoimmune disorders or asthma, long-term exposure to these contaminants can lead to chronic health issues.
Visible signs of water damage, such as discoloration on walls or ceilings and persistent musty odors, are warnings that water intrusion is continuing to deteriorate the building’s materials. Further indicators include sagging ceilings and warped flooring, which can indicate the presence of weakened joists or framing. Identifying these problems early can save thousands in repair costs and prevent the need for costly repairs or foundational reinforcements.
Electrical Hazards
Water damage that reaches electrical components can cause short-circuiting, equipment failure, and electrical fires. It’s important to have a qualified electrician evaluate the condition of affected devices before re-energizing them. Signs of deterioration include corrosion, rust, discoloration, and fuzzy growth on the surface of component parts. How long water-damaged equipment was submerged in floodwaters and the type of floodwater can also impact its long-term performance, safety risks, and whether it can be reconditioned or replaced.
Even a small amount of water reaching outlets, junction boxes, and wiring can corrode metal parts, disrupt connections, and raise resistance, which in turn leads to short circuits, electrical fires, and possible electrocution. It’s crucial to turn off power sources and open up cabinets to examine all exposed equipment for signs of water-related damage.
In addition to electrical hazards, untreated water damage allows for the growth of mold, musty odors, and other environmental issues that may affect occupants’ health. Mold thrives in damp conditions and can exacerbate respiratory problems in occupants, leading to symptoms like coughing, sneezing, and difficulty breathing.
Additionally, damp environments encourage wood rot and can compromise the structural integrity of your home’s foundation. This can result in expensive repairs and a lowered property value, if you choose to sell your home. It’s best to invest in timely professional restoration services to minimize the cost of costly long-term repairs. The longer you wait, the more extensive the damages become, which can lead to higher costs for drywall replacement, floor repair, and structural rebuilding. Water damage can also damage personal belongings, such as furniture, photographs, and documents, which can be irreversibly ruined. These items are also likely to be contaminated with bacteria, viruses, and other pathogens that can spread through the air as mold spores.
Mold Growth
Moisture creates the perfect breeding ground for mold, which thrives in damp environments. Left untreated, mold spores can spread quickly, causing musty odors and aggravating respiratory issues for household members.
The fungus grows in porous materials that retain moisture, such as drywall, carpets, insulation, and paper-based products. The spores can travel through the air, and they may attach themselves to clothing or pets and be carried inside the home. Long-term exposure to these allergens can lead to a variety of health problems, including headaches, allergies, and asthma.
Even if the visible signs of water damage are removed, hidden moisture can wreak havoc on building materials, causing structural weakening and even wood rot. If you notice warped floors, sagging ceilings, or crumbling drywall, consult with a professional restoration service to prevent the problems from getting worse.
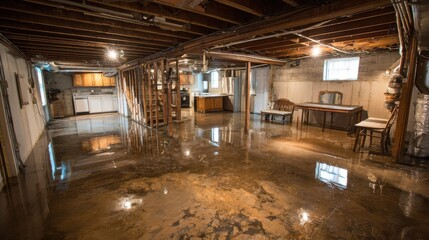
A leaking toilet, burst pipe, or washing machine can leave standing water in the home. Make sure to check the hoses and seals on these appliances regularly to avoid any accidents or leaks. Keeping gutters clear and properly positioned can also keep rainwater from pooling around the foundation of the house, which can cause foundation problems.
The best way to mitigate the effects of water damage is to take action immediately. Turn off electricity in the affected area and use fans to dry out the space as soon as possible. If the contaminated area is large, consider hiring a professional restoration company that offers dehumidification and drying processes. This process reduces the damage to building materials, furniture, and personal belongings. It also ensures that the contaminated areas are thoroughly dried, preventing future water damage and mold growth. The professional restoration team also sanitizes the area, removing any contaminants that pose a risk to health.
Pest Infestations
Water damage weakens building materials, exposing them to decay and infestation. Even a small leak, flood or overflow can leave behind serious structural damage and safety hazards. It also creates hidden entry points for pests. Drywall crumbles, paint blisters, and wood swells or rots. Every crack and crevice becomes an invitation for ants, termites, rodents and other unwanted guests. Mold and mildew also form in moist areas, spreading musty odors and dangerous respiratory irritants throughout the home.
Termites, cockroaches and other insects are attracted to moisture for their survival. Damp areas teem with their prey, and swollen wood makes for easy gnawing and nest-building. Water-damaged crawl spaces, attics, and basements offer ideal living conditions for pests as well.
Infestations of any kind worsen the effect of untreated water damage, reducing a home’s value and threatening its occupants with health risks. Cockroaches drag bacterial contaminants into pantries and bathrooms, spreading germs across surfaces you touch each day. Rodents chew wires, posing electrical fire dangers. Mosquitoes harbor diseases like West Nile Virus and Zika in damp, humid areas.
Professional restoration services eliminate the underlying causes of water damage, stopping problems from growing and escalating. Emergency response, water extraction, drying equipment, foundation waterproofing and crawl space encapsulation all reduce the risk of future problems. Foam, caulking, and other professional-grade sealants close any gaps and cracks where pests can enter. Regular monitoring and ongoing moisture control help prevent re-infestations. By addressing a home’s vulnerability to pests and water damage, homeowners protect their property and their families. By acting quickly, you can avoid major costs and long-term effects. Water damage is a problem that should never be ignored. If you experience a leak, overflow, or other water-related issue, call Rescue Restoration for fast, reliable emergency service.
Decreased Property Value
Property values are a major investment, and there are many factors that impact the value of your home. Some are out of a homeowner’s control, such as living near a landfill or industrial area or having a neighbor with a junk-strewn yard or loud dogs. Natural disasters can significantly decrease property value as well, and zoning changes can introduce incompatible uses into neighborhoods.
Water damage can also decrease a property’s value, particularly when it goes untreated for an extended period of time. Visible water stains, musty smells, and structural issues are easy for buyers to identify and can cause them to offer less money or walk away altogether from the sale. In addition, a property with a history of water problems may be subject to additional inspections and mortgage lender requirements, further decreasing its marketability and potential resale value.
Additionally, long-term water damage can lead to mold growth that erodes building materials and poses health risks for occupants. Mold can trigger respiratory issues, skin irritations, and other problems for people with allergies or weakened immune systems. Likewise, a serious leak or flooding can compromise a home’s foundation and lead to expensive repairs.
While most homeowners focus on improving their homes to increase their property value, it’s important to understand what can decrease a home’s value as well. Serious structural damage, costly repairs, and neglecting preventative maintenance are the top factors that decrease a home’s value. This includes a lack of maintenance, like water staining, cracks in the foundation, or wood rot, as well as putting off routine maintenance, such as clearing gutters, painting, and repairing roof damage. If you are considering selling your home, you should take a proactive approach to maintaining it and identifying and treating any problems.